
|
K6JRF's Page formerly W6FZC My Mercedes Benz S500 Coupe |

|
Analyze and Troubleshoot "Check Engine" MIL and Electronic Control Units (ECU)!
|
Fix the VDO Fuel Sender Unit
Description |
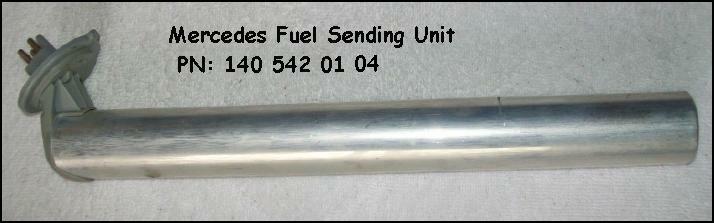 The picture shows the overall outside view of the FSU. The aluminum tube is about 18" long and it serves to protect and minimize vibration to the "float" inside the unit. The connector has three (3) pins, two of which are the direct measurement of the 'resistance'. A few words about the FSU operation. It's a simple device (meaning it should/could last forever) that uses a resistance measurement to show the amount of fuel in the gas tank. The HIGHER the resistance, the LOWER the gas level in the tank. For my unit, 90 ohms is the "low" value; 1 ohm is the "high" value indicating a full tank of gas. |
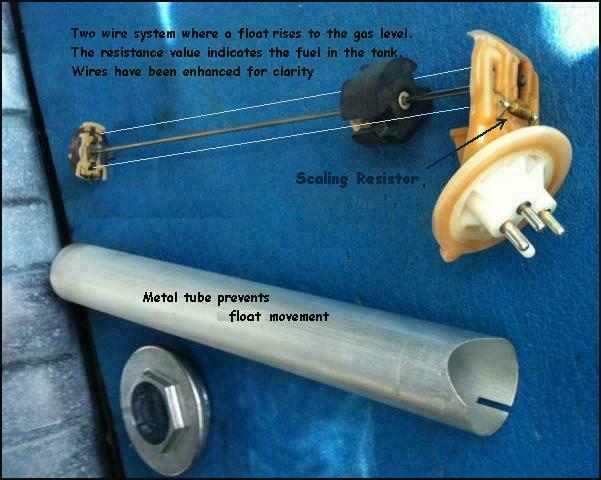 Removing the cover shows the internal parts. The "resistance" measurement is made with two (2) parallel lines that run the length of the FSU. The "float" is the black colored disk that rides up and down the main support rod and shorts the wire line depending on where it is. Pretty simple . . . should be reliable. There's a "scaling resistor" that is literally selected at final test to ensure that any given FSU is IDENTICAL to the any other FSU. This resistor is soldered in after a basic wire measurement is done. The value is unknown since mine is not marked; to measure it, I would have to remove (break) the wire "loop" so that it's value can be read with an ohmmeter. More on this resistor later. |
|
Repair Vince said that most times, the wires break and so the unit is not repairable. However, my unit was intact and looked "almost" like new even after 20 years! I used a degreaser, then contact cleaner and finally inspected the wires including the "shorting" mechanism. Since the wires were intact it has to be an intermittent connection and s/b fixable. Looking at how the wires are shorted by the float showed that there's a set of bronze 'fingers' that push on each wire to ensure that it makes contact with the shorting bar. This must happen on BOTH sides for the resistance measurement to work. Normally that would be the point of failure so that's the place that needs to be "fixed". So after degreasing, contact cleaning, wire inspection and making slight force adjustments, it was reassembled and put into the gas tank. I THOUGHT it worked but after a few seconds the fuel gauge slowly rose to show a "full-tank". 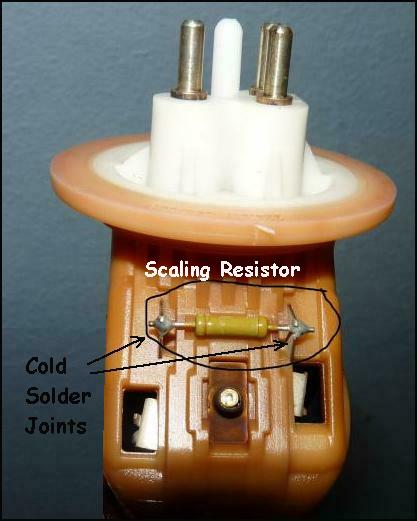 So it's not fixed! Again I readjusted the force on the wires, cleaned and reassembled the FSU. After the second test, the results were identical to the first. I'm missing SOMETHING that's right in front of me! Using my VOM, I wired it so that I could dynamically measure the resistance and that's when it problem became clear. I didn't quite believe it b/c the solder joints looked OK. But the solder joints were "cold" b/c every time I went to test, the VOM measured "OPEN-CIRCUIT" until it was "wiggled"!! The scaling resistor was not in parallel (electrically) to the 'wires' as it should be. If that resistor is "open" then the resistance reading will be high and the IC fuel gauge will show "full". So the fix is now obvious. Got the soldering iron, used some quality flux and resolderd the both joints. That was it! Now the fuel gauge is functional. Conclusions So sometimes, you need to look closely at something that doesn't appear to be bad! Hope this helps the next person. A new part availability is difficult. An extensive "parts-database" search was done as well as checking with other MB shops for a new part and the only one found was in Dallas, Texas. The price for it is $185. Since the car is now 20 years old, this is a worthwhile check to see if it can be repaired. |
|
Send me |