
|
K6JRF's Page formerly W6FZC My Mercedes Benz S500 Coupe |
|
Analyze and Troubleshoot "Check Engine" MIL and Electronic Control Units (ECU)!
|
Fixing a leaking A/C Evaporator in a W140!
AC Problem |
||||||||||||||||||||||||||||||||||||||||||||||||||||
W140 Model A/C System Diagram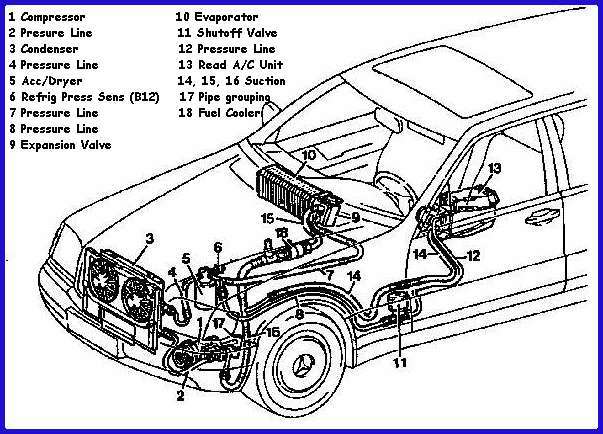 The picture shows the typical components in the W140 and C140 A/C systems. Note that some models have a 'rear' A/C unit
and it is shown for completeness. My C140 does not have this feature.
The picture shows the typical components in the W140 and C140 A/C systems. Note that some models have a 'rear' A/C unit
and it is shown for completeness. My C140 does not have this feature. In the 140 cars, the BASE MODULE plays the key role in the A/C system. See MENU#8 for more information on its operation. Suffice to say that it is this module that controls (drives) A/C clutch on the compressor provided all sensors are 'go'! |
||||||||||||||||||||||||||||||||||||||||||||||||||||
|
Rebuilding the AC System The effort started on Saturday and it finished 10 hours later! I used the services of a MB pro and we worked as a team, a pretty good team if I say so myself. 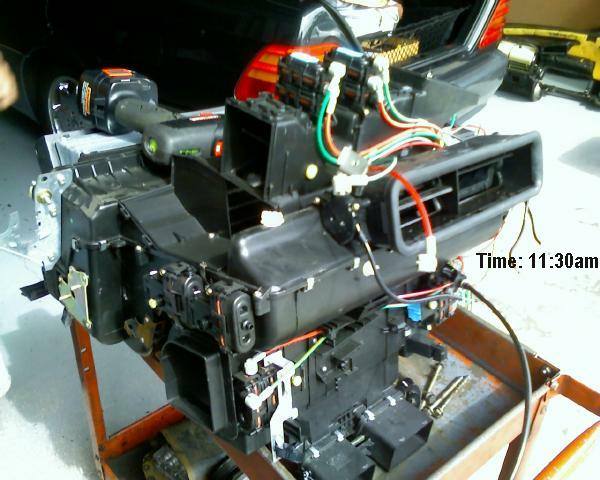 We had "zero" problems, that is nothing broke and everything fit perfectly. Also 'we' didn't break anything. The ACM evap
was an exact replacement for the leaking Behr, so it fit perfectly w/o any problems. The case closed w/o any problems. Not
sure what the vintage of the old Behr evap (at least 13 yrs old) was but it didn't leak from the 'amalgam' of cu/alum. It
leaked at the alum 'weld', so I learned something. The new Behr evap was identical in construction to the failed one but I
decided to use the ACM. It's all aluminum and has a built-in expansion (Txv) valve.
We had "zero" problems, that is nothing broke and everything fit perfectly. Also 'we' didn't break anything. The ACM evap
was an exact replacement for the leaking Behr, so it fit perfectly w/o any problems. The case closed w/o any problems. Not
sure what the vintage of the old Behr evap (at least 13 yrs old) was but it didn't leak from the 'amalgam' of cu/alum. It
leaked at the alum 'weld', so I learned something. The new Behr evap was identical in construction to the failed one but I
decided to use the ACM. It's all aluminum and has a built-in expansion (Txv) valve.We flushed the hoses after the evap was out and there was way too much oil in the system as well as the hoses. Not sure how it got there but it was all cleaned out. The good feature about replacing items is that you can be sure that there's no oil in them except for the compressor. It comes with all the oil needed for the system. Results The job was stated at 7:00a and all finished by 5:00pm. Then it was put under vacuum for 20 mins, leak test for 15 mins and finally, charged to 2.5lbs. The work was done at my tech's shop so we had all the tools necessary. After initial charge to 2.5 lbs, the A/C system blows really cold air! Specifically, it cycles from 37F to 42F as the compressor cycles with the car at fast idle (1000rpm). Low side pressures are good, about 30lbs while high side is equally ok, about 175lbs. These numbers were measured on Saturday with a temp of 78F. 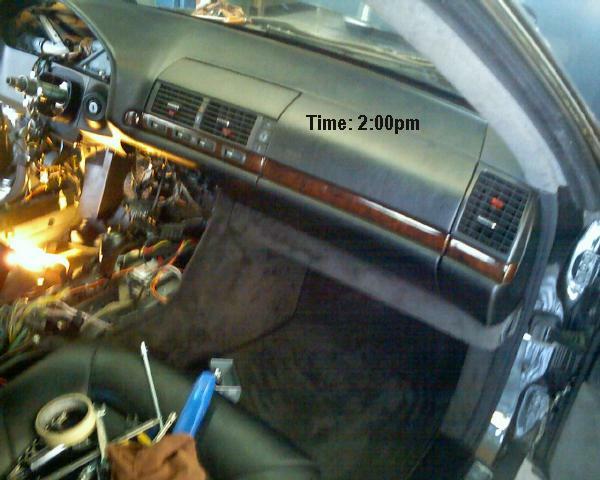 Checking Operational Pressure
The Low Side Service port will generally found on the a/c line between the compressor and the evaporator. Also located near the Receiver/Dryer on the driver side wheel well. The Hi Side Service port is located on the narrower a/c line between the Compressor and the Condenser and the Expansion valve. To check operating pressure, start the engine in an open space (not in a closed garage). - Turn on a/c; set controls into the BLUE area with blower in MAX. - Measure the outside ambient temperature; insert a temperature probe into the main center port or use the #5 setting under the OPERATIONAL CHECKs section of MENU #15. - Set the engine rpm between 1500 to 2000rpm. - Connect the appropriate hose coupler to Hi Side Service Port to take readings. The chart shows outlet air temperature, in BLUE, readings that represent MINIMUM performance requirements at 40% and 80% Relative Humidity [RH] with the engine at high-idle speed. |
||||||||||||||||||||||||||||||||||||||||||||||||||||
Note that the high side pressures are very dangerous, so be careful. Troubleshooting Different Readings1) Low AND Hi Pressure reading is LOW Usually indicates a low refrigerant charge. Begin by adding one can of R-134a and take another reading. For most Mercedes, the Receiver/Dryer has a sight glass where bubbles can be seen when the compressor is running. This is usually a sure sign of an undercharged system. 2) Low Pressure reading is LOW and Hi Pressure reading is HIGH Usually indicates a blockage in the system possibly at the expansion valve or orifice tube. Requires service. 3) Low Pressure reading is HIGH and Hi Pressure reading is LOW This condition when accompanied by a widely vibrating gauge needle usually indicates a faulty reed valves in the compressor. Requires service. 4) Low Pressure reading is HIGH and Hi Pressure reading is HIGH This condition usually indicates an overcharged system. Slowly remove gas through the LOW Side port until cooling returns and Hi Pressure reading returns to a normal reading. Monitor the sight glass: you should see a 'few' bubbles that quickly go away in a few seconds after the compressor engages. Refrigerant Pressure Switch and Climate Control Module Important for proper A/C operation is the Refrigerant Pressure Switch [B12] [RPS]. This is located on the side of the accumulator/dryer and must function in order for the A/C compressor to run. It senses that there is positive pressure due to the refrigerant and allows the compressor to run. The table below shows the relationship between the Aux fans and engine temperature operation vs A/C pressure. Also see Menu #18 for more details. Part of this section has been included here for completeness. The S500 series car has two (2) fans that can draw up to 35 amps at full tilt and are switched-on in three stages. They can be activated by either temperature via B10/8 or refrigerant pressure via the N22 module. The table below shows the activation points for the auxiliary fans in bar and psi. The push-button panel is located inside the car and is the main Climate Control Module [N22] on the center console just above the radio.
Assuming that the A/C compressor is operating, to test proper Aux fan operation, connect a pressure gauge on the Hi Side Port, and observe the reading. At apx 206psi or 14 bar, the fans should come on in the low speed mode. If not, suspect the N22 module if you are certain that the a/c system is properly charged, the compressor is working satisfactorily and the temperature is high enough to ensure the system getting to 14 bar. If the system is under charged or if it's a cool day, the pressure may never get over 11 bar. If there is refrigerant and the A/C compressor does not run, then test/replace the RPS. To remove the left headlight (drivers side) to gain access to the accumulator/dryer. To remove the B12 connector, press the top of the retaining wire downward while pulling on the cable connector. |
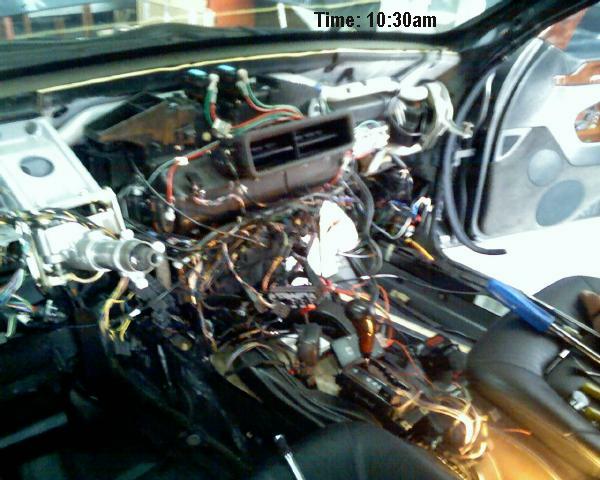 The above words are enough to make an W140 owner shake in his boots! This literally 'gruesome' job is not a pleasant
repair task to undertake on this model car. The picture shows why! The complete interior of the car must be disassembled
including center console, dash and almost every major functional device housed within.
The above words are enough to make an W140 owner shake in his boots! This literally 'gruesome' job is not a pleasant
repair task to undertake on this model car. The picture shows why! The complete interior of the car must be disassembled
including center console, dash and almost every major functional device housed within. |
Send me |