|
K6JRF's Page formerly W6FZC My Mercedes Benz S500 Coupe |
 |
Analyze and Troubleshoot "Check Engine" MIL and Electronic Control Units (ECU)!
|
Fix your Hirschmann Auta 6000EL Power Antenna
Description |
 Another 2 years went by and in Aug 2003, the antenna wouldn't go up when I turned the radio on, so time to find out why. This
is the 'second' most common failure in the unit, a broken "tab" from the Front or Back gears. This note shows how I fixed the
Auta 6000EL with a screw and some super glue. Replacement parts (at that time) were hard to find. Mostly, parts were taken
from other Hirschmann "carcass".
Another 2 years went by and in Aug 2003, the antenna wouldn't go up when I turned the radio on, so time to find out why. This
is the 'second' most common failure in the unit, a broken "tab" from the Front or Back gears. This note shows how I fixed the
Auta 6000EL with a screw and some super glue. Replacement parts (at that time) were hard to find. Mostly, parts were taken
from other Hirschmann "carcass". |
|
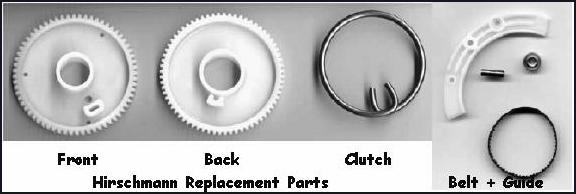
The parts shown in the picture are the ones that most often 'break' or wear the most. With these you can fix 99% of the
Hirschmann failures. The kit has the front and back gears plus the spring clutch and, finally, the belt + roller guide. If
these were readily available, I would have purchased them since it's a good long term investment. However, I couldn't find
them, so I proceeded to fix it with what I had. Update: Hirschmann parts are now readily available; see the bottom of this page for sources. |
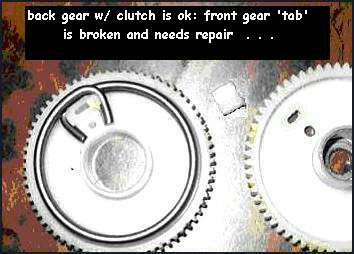 Failure: Aug 2003
 The picture shows how my Hirschmann failed. The small 'tab' on the Front wheel was sheared off from old age. The clutch is very stiff and exerts a lot of force on the molded plastic tabs. So after 9 years, it broke. My MB tech, Pat, showed me a 'trick' to repair the unit. However, after all that time, the 'picture' was a bit fuzzy however, I remembered using a "screw". After looking over the gears, the picture started to clear. As you can see, the gear 'tabs' are 'marked' with holes so that it's quite easy to repair a broken tab since you have a 'hole' to show where the tabs should be placed and, most importantly, serve as a place to use a 'screw' to repair the broken tab as good as new! Well, not quite as good as new but actually very strong repair if it's done correctly. |
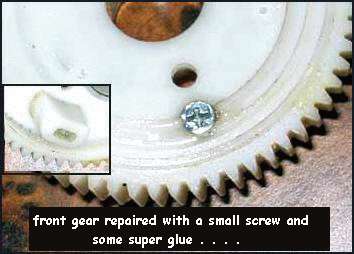 Repair
 This picture shows the repaired gear with a screw. The screw head is ground and counter-sunk to ensure that the gears can rotate freely and not bind. The inset picture shows the tab on the back side held in place with super-glue. The screw provides the strength and you should not depend on 'super-glue' to hold the tab b/c it won't! About 5 years later (2008), the "super-glue" repair failed (tab broke off) so a new Hirschmann repair kit was installed. That lasted about 6 years and the pin-clutch failed again. That was repaired with a 'full-kit'. |
|
Repair Update: May 2014 Now some 6 years later, the pin-clutch broke so it's again time for a complete overhaul including the roller gear which showed wear. It s/b replaced b/c it will cause the mast to momentarily slip as it retracts. TIP: Making antenna feed easily into the channel: Grind off (moto tool or file) the nylon end of the antenna until is "pointed". This makes the re-insertion of the antenna into the feed very easy. When an older antenna has been used, it will be "flat" on the end and you will have difficulty getting the antenna to start the feed into the mechanism. Also since it's older, the nylon has taken a "set" in the circled position further causing the antenna to bind in the feed channel. Recommend that you gently straighten out the last 12" or so to minimize binding when feeding into the channel. Front/Back Gear and Clutch Comparison  The picture shows an early Front and Back gear (left) contrasted with a newer Front and Back gear (right) including the old and new
"clutch".
The picture shows an early Front and Back gear (left) contrasted with a newer Front and Back gear (right) including the old and new
"clutch". The old clutch is a SINGLE turn spring steel wire of 0.134" dia and is extremely stiff. Comparing that with the new style of two (2) turns of 0.125" dia shows to be much more flexible and should make the internal tabs on the Front and Back gears last much longer. |
|
An Antidote . . . The question arises as to what's the correct way to align the front and back gear "tabs"?? We know that they should be aligned such that the FRONT gear [720095] tab is directly ABOVE the REAR gear [720094] tab when the two halves are mated. It's correct when you can't turn the BACK gear in relation to the FRONT gear but just a few degrees. If you can spin the BACK gear, then the alignment is NOT correct and should be corrected. On some versions, you should be able to see through the hole in the front gear showing the hole in the BACK gear tab. Suppose the two gears are NOT aligned, will it work properly in this position? Actually it will . . . BION! What happens is a apx 1 sec delay when the antenna is RAISED and LOWERED. The reason is simply that the FRONT gear must spin around to encounter the BACK gear tab. And the same thing happens when the antenna is lowered. It's the BACK gear that drives the antenna up and down. It does go up and down properly but I do NOT recommend that you do use it this way! However, I have tried this method, and it works just fine. It appears that there may be MORE tension on the BACK gear TAB due to the physics of this setup. As an experiment, I purposely mis-aligned the "tabs", installed it into the Auta 6000EL housing and used it until it failed. Unfortunately, it only last about 27 days (I didn't do as good of a S/G job as on other occasions). In this mode, there is much more pressure on the tab as a radial force which causes it to sheer. |
|
Hirschmann Auta 6000EL Exploded Part Diagram This exploded view shown here is great for assembling or disassembling the Auta 6000EL. The unit comes apart easily (gently pry the tabs w/ small flat blade screwdriver) and the individual parts can be replaced by following the assembly diagram above.
|
Hirschmann Replacement Antenna: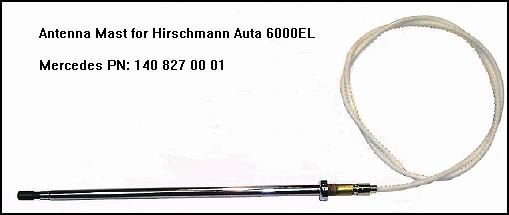 The correct antenna for a early series 94 -'99 W140 class is 140 827 00 01. This mast is
three (3) sections and the last is black. This antenna was used for the mobile cell phone. This fits the Hirschmann Auta
6000EL, 6000KE and others.
The correct antenna for a early series 94 -'99 W140 class is 140 827 00 01. This mast is
three (3) sections and the last is black. This antenna was used for the mobile cell phone. This fits the Hirschmann Auta
6000EL, 6000KE and others. When the antenna is fully extended, the total length is 24". The individual section lengths are; 7.5"= 1st; 8" = 2nd; 8.5" = 3rd. This varies abit with different antennas. Have personally measured 23" to 24" on two different brands. The original Hirschmann had a metal rod in the top (black) bakelite section. It appears to be electrically isolated but isn't; it's electrically attached to the rest of the antenna. Some have stated, incorrectly, that the URO replacement antenna's top section is not "electrically" attached b/c there's no metal rod. The fact that's overlooked is that the top section is all METAL so a separate metal rod is not required. Length of the flexible "nylon" section is apx 75 cm (29.5"). Be sure to check the length b/c many times the piece of the nylon section will break off and appears OK when in actuality, it's too short. |
Hirschmann Auta 6000EL Operation . . .  When the radio is turned on, the "switched +12V" is supplied to relay coil. The relay's MAIN contacts energize
and supply the "battery 12V" to start the antenna motor causing the antenna to extend. After apx
15.5"* is extended, the ALT contacts remove the motor's power so the antenna stops and
remains extended. Also note that the battery 12V has been switched to the lower contact set.
When the radio is turned on, the "switched +12V" is supplied to relay coil. The relay's MAIN contacts energize
and supply the "battery 12V" to start the antenna motor causing the antenna to extend. After apx
15.5"* is extended, the ALT contacts remove the motor's power so the antenna stops and
remains extended. Also note that the battery 12V has been switched to the lower contact set. When the radio is turned off, switched +12V power is removed from the control relay and now the motor's "battery +12V" power is now reversed, causing the antenna to retract. After 15.5" is retracted, the ALT contacts remove the motor's power and return all contacts to their initial position waiting for the radio to be turned on to initiate the cycle again. * The fully-extended antenna length is apx 23" to 24" but only 15" to 15.5" control-cable length is required to make that happen! |
|
Hirschmann Repair Parts Sources: The following sources can either supply parts for the DIYer or fix the Hirschmann if you are not capable. George Murphy can supply parts for the DIYer and George may have some old parts laying around or offer a replacement power antenna for a reasonable price. Here's the latest sources for repair parts. * Walter Odemer has passed away and it appears that his business is 'closed'. If you are able to make contact with somebody, please let me know. I've been unsuccessful on three (3) attempts. Email: odemer@sbcglobal.net. Direct phone #: 818 846-2819 * George Murphy of Performance Analysis Co. Check out PAC's web page here and their many unique products. Direct phone: 865-482-9175. He says why bother with fixing the OE antenna motor. He has NEW Hirschmann motors w/mast for $79 plus s/h. He was kind enough to send me a complete Front + Back + Clutch for my Auta 6000EL. His email: perfanalysis@comcast.com * Amazon Web: here Amazed to find these parts on Amazon!!! Price is reasonable to boot! * AntennaMastsRus at 920-686-0644 Web page shows here. They appear to have a full line of replacement masts to repair your Hirschmann antenna for reasonable prices. Also have hard-to-find upper and lower seals plus antenna tube parts. The parts for your 1994-1999 S500 (mast, seals, gears, etc.) are here. Very reasonable price!! Hirschmann Repair Parts in Europe: Thanks to Graham in the UK, he has sent me a site that has repair parts for your Hirschmann. Check out the eBay site here. Repair of the Hirschmann antenna is very straight-forward and almost "easy"! Parts can be purchased for $30 so considering that a new Hirschmann is apx $600, it's a very worthwhile repair. |
|
Send me |