|
K6JRF's Page formerly W6FZC Outside and Inside Update Pictures Photos by K6JRF |
(Updated: Jun 18, 2015)
|
Backyard and Pool Updates My backyard has been neglected for many years and a quick look by any casual observer would verify that statement. The pool (16' x 31') is about 43 years old and was resurfaced 11 years ago with fiberglass technology. In contrast, a plaster pool would be in pretty bad condition since plaster's life is 4 - 5 years tops. The fiberglass is still in very good condition except for some rust spots and one crack near the water return. The concrete deck surrounding the pool was in equally bad condition; 41 years of sun, chlorine and general aging has discolored and mottled the surface. In addition, there are large cracks make it visually ugly! The gazebo was rebuilt apx 15 years ago and other than a badly needed re-staining, was in decent condition. After checking local contractors, I decided to use a concrete "overlay" process that would refresh the concrete and allow the new concrete top to be stained. And, of course, the four large cracks will be repaired first. This unique process involves the thorough prepping of the old concrete using a water-pressure (3000psi) and when clean, a final weak acid washing. The cracks are fixed by opening them and using a "crack-bonder" material plus dry-wall tape to make them invisible. After the acid-wash, a apx 1/8" layer of Super-Krete was applied by trowel as it bonds to the old concrete. It's finished with using a 'broom' to produce small lines. This is an ideal finish for a pool deck since it almost guarantees that you won't slip. The old concrete had a salt-finish which had become so slippery that you were always afraid of falling. Next an acrylic stain is brushed over the finish of your chosen color to give the desired color. After drying, the surface is sealed, again with an unique product made from acrylic resin to form a very effective dirt and water shield. Even rejects bird-poop! Local work was done by JoseF Concrete [619 450-4572] under the direction of Jose Flores. The overall effort took almost 4 weeks since the concrete prepping required almost 2 weeks to get the old concrete deck into acceptable condition. I recommend him since the pricing was fair and he and his crew were willing to please the customer. The pictures below show the finished product. |
|
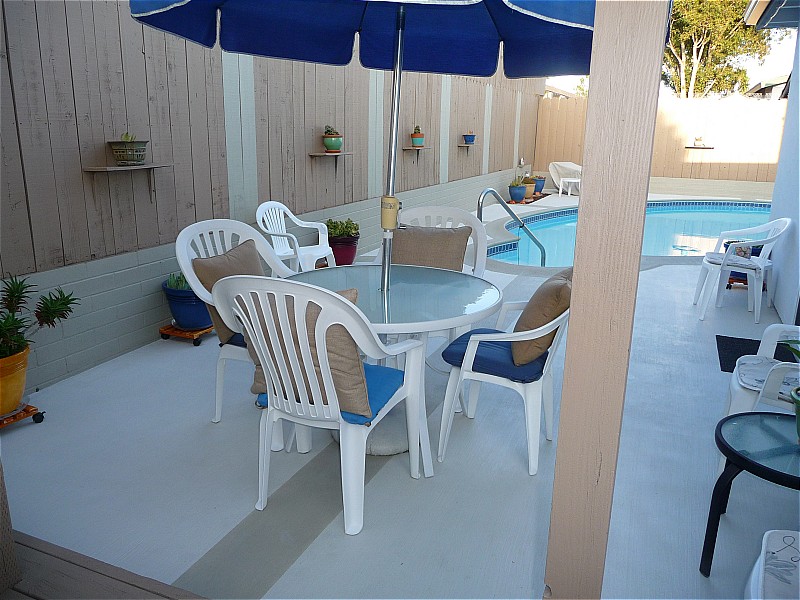 The picture shows the view from mid-deck across the back showing the pool and picnic table. Although the chairs and table look brand
new, they're not!
I added the accent stripes to the pool deck and fence after a suggestion from Jose's people. It added some verve to the area.
The picture shows the view from mid-deck across the back showing the pool and picnic table. Although the chairs and table look brand
new, they're not!
I added the accent stripes to the pool deck and fence after a suggestion from Jose's people. It added some verve to the area.The dark color is Super-Krete's "concrete gray" and the lighter area is mix of 50% "white" with 50% concrete grey. It produces a light grey color which reflects the sun and always stays cool on your feet! Very important for summertime in San Diego IMO. |
|
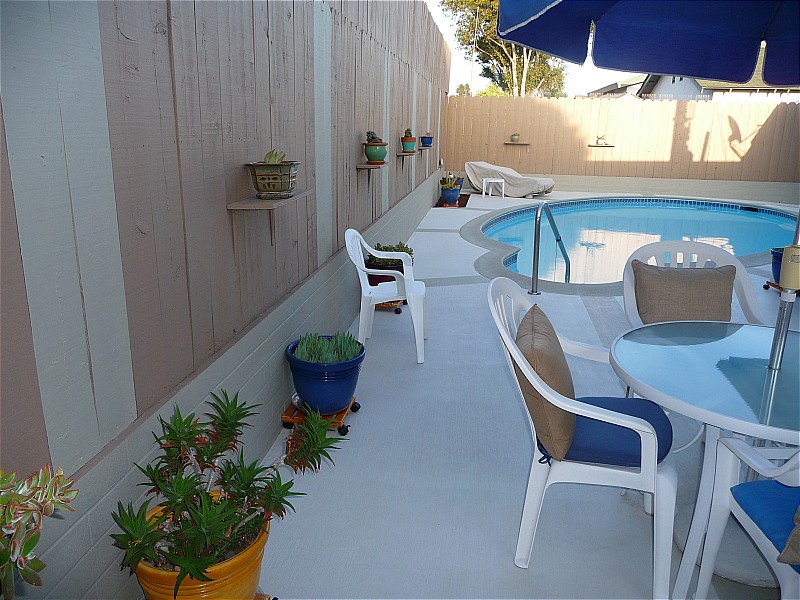 The picture shows the view from the end of the deck across the back side showing the table, pool and chaise lounge. All chairs and
table were power-washed and the glass table re-painted. It's amazing how well a pressure washer (1800psi) can do; removed
years of dirt and ground-in grime leaving the chairs looking like brand new.
The picture shows the view from the end of the deck across the back side showing the table, pool and chaise lounge. All chairs and
table were power-washed and the glass table re-painted. It's amazing how well a pressure washer (1800psi) can do; removed
years of dirt and ground-in grime leaving the chairs looking like brand new. My wife suggested that we mount the container pots on sliders so that it would be easier to water-clean the area. With the plants on rollers, no dirt can collect behind or under the plants, making for a quick water cleanup of the area. This, I'm happy to say, worked as planned. |
|
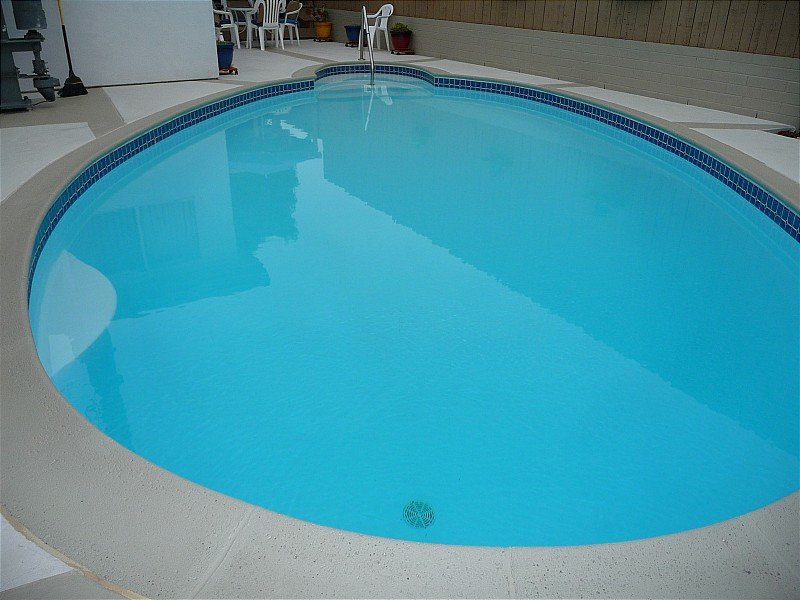 The picture shows the view looking to the west showing the complete pool. The pool is about 41 years old and was refinished
about 11 years ago using using the FibreTech process. Compared to plaster
finish, fiberglass is in a class by itself. Especially if you consider that by now, the plaster would be 'shot' and require
a complete refinish.
The picture shows the view looking to the west showing the complete pool. The pool is about 41 years old and was refinished
about 11 years ago using using the FibreTech process. Compared to plaster
finish, fiberglass is in a class by itself. Especially if you consider that by now, the plaster would be 'shot' and require
a complete refinish.BION, I personally refurbished the pool using . . . CLR! CLR [Calcium, Lime and Rust Remover] has been around a long time and its claim to fame is that it quickly and easily removes calcium, lime and rust! To clean the pool's surface, I emptied the pool, used a power sprayer filled w/ undiluted CLR and simply sprayed to thoroughly wet an designated area. After 2 - 3 minutes, I scrubbed the area using a medium bristle brush. Then a quick power rinse and the C, L and R have been removed. The surface is absolutely clean and white. Amazing! CLR will not remove any of the surface as acid-washing will do. And there's no smell! The bad part is it's relatively expensive, apx $30 to $40 per gallon! However, I used less than one gallon to clean the complete pool including tile so the cost is not prohibitive esp considering how easy it is to use. There were some rust stains that CLR removed but some of the stains were caused by small, embedded pieces of metal. When water finally penetrates that area, a rust spot appears. CLR plus fine grit sandpaper removed all of these. The pool looks like it's brand-spanking new! The tile was also cleaned with CLR using stiff bristle brush to previously applied CLR. It removes about 95% of the water-scum line off. |
|
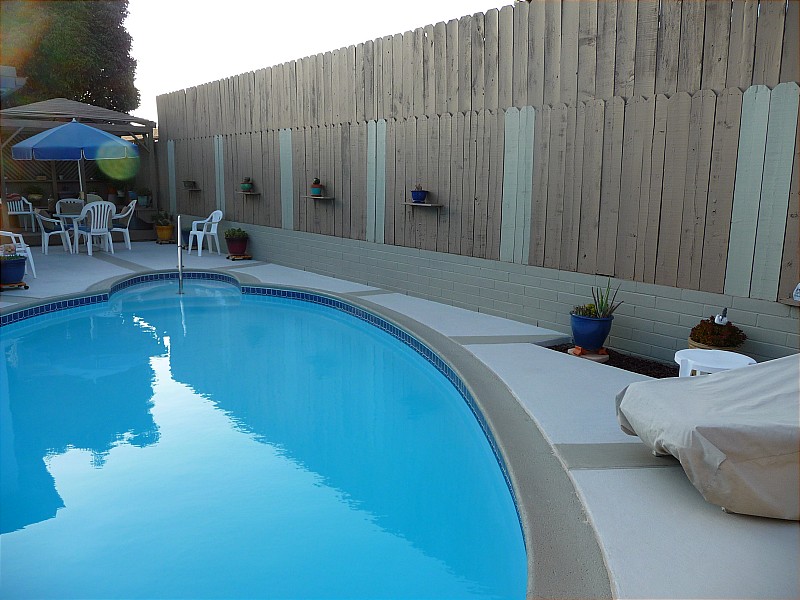 The picture shows the view toward the west showing the pool and table area. The accent strips are easily seen here.
I raised the fence about 15 years ago to afford complete privacy to the back yard and pool area. It has worked successfully. The fence and gazebo colored stain is "taupe" . . sort of a gray-brown color. Matched nicely with the concrete gray color of the block wall. Partially visible is the container plant area to give the area some contrast. |
|
 The picture shows the view toward my tower shot looking to the west.
 I made a 'square' area around the tower's bottom using the concrete gray to ensure minimal rust stains on the concrete surface. This area was problematic in the past since the concrete tower base was not tied into the existing pool deck area. This time, extra care was taken to make a continuous surface that flows down into the drain [appears a black 'dot']. The drain goes out to the front of the house into a weeping area. Glad to say that it's working as planned. On the "mast", is a 5 el FM yagi along with a small UHF yagi that's used to receive network OTA HD broadcasts. The HD picture quality is typically 720p or 1080i and is excellent. 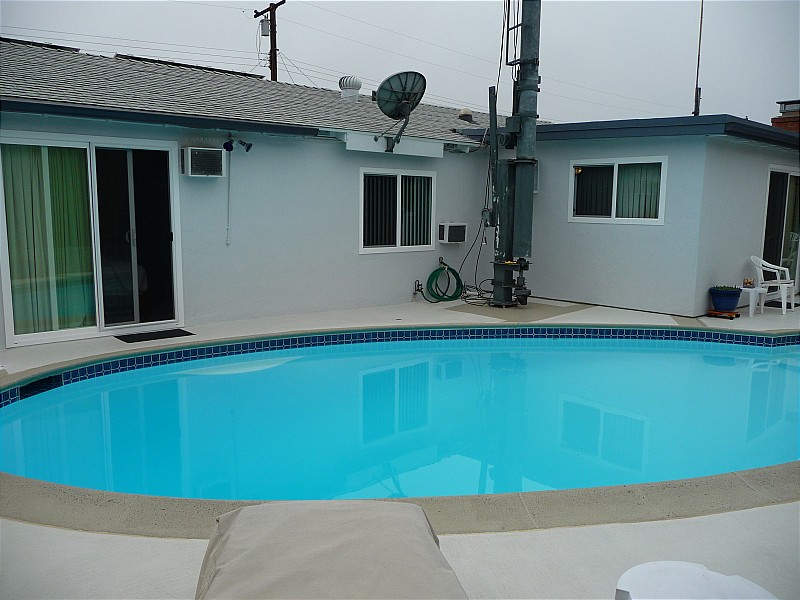 Recently, we had a chance to buy new energy-efficient doors and windows for a realistic price so I took advantage of the offer.
Shown here is the back side of the house with the new windows and doors. The bedroom door installation took nine (9) hours with
seven (7) needed to repair due to the extreme water damage to the door's footer that occurred over a 40 year time period. To say
that my wife is happy is a huge understatement!!
Recently, we had a chance to buy new energy-efficient doors and windows for a realistic price so I took advantage of the offer.
Shown here is the back side of the house with the new windows and doors. The bedroom door installation took nine (9) hours with
seven (7) needed to repair due to the extreme water damage to the door's footer that occurred over a 40 year time period. To say
that my wife is happy is a huge understatement!! Note the bird-spikes on the top of the bedroom A/C unit. It may seem excessive but the birds were relentless this spring in trying to make a nest there. Yes, it took the myriad of bird-spikes you see to keep them away. Some time ago, I remounted all of the satellite dishes on the back rafters so as to eliminate the 'holes-in-the-roof' mounts. This installation is much more stable and long lasting. Access for maintenance is also improved. |
|
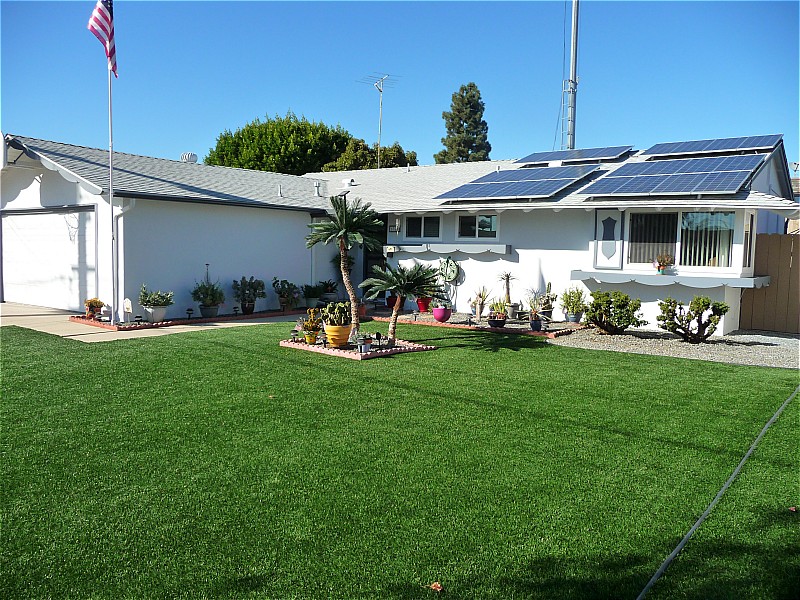 Here's the completed front view of my house . . . complete with a new roof! It was done the right way; tear off all old layers, fix
any broken or bad boards, spray termite repellant and finally, reroof with 30 year shingles featuring an off-white color for maximum
heat rejection. The house proper was repaired (soil line stucco and blister/peeling facia boards) and then painted with 25 year paint.
Finally, all of the gutters were replaced. All solar panels were reorientated to catch the maximum amount of sun. My 12 year old
solar inverter was also replaced with a new model that has 97% overall efficiency that significantly reduces my electric bills.
Here's the completed front view of my house . . . complete with a new roof! It was done the right way; tear off all old layers, fix
any broken or bad boards, spray termite repellant and finally, reroof with 30 year shingles featuring an off-white color for maximum
heat rejection. The house proper was repaired (soil line stucco and blister/peeling facia boards) and then painted with 25 year paint.
Finally, all of the gutters were replaced. All solar panels were reorientated to catch the maximum amount of sun. My 12 year old
solar inverter was also replaced with a new model that has 97% overall efficiency that significantly reduces my electric bills. All of the old satellite dishes were remounted to the house's eaves making them invisible. The small FM (top) and UHF yagi (bottom) are for local FM and OTA HD reception respectively. |
|
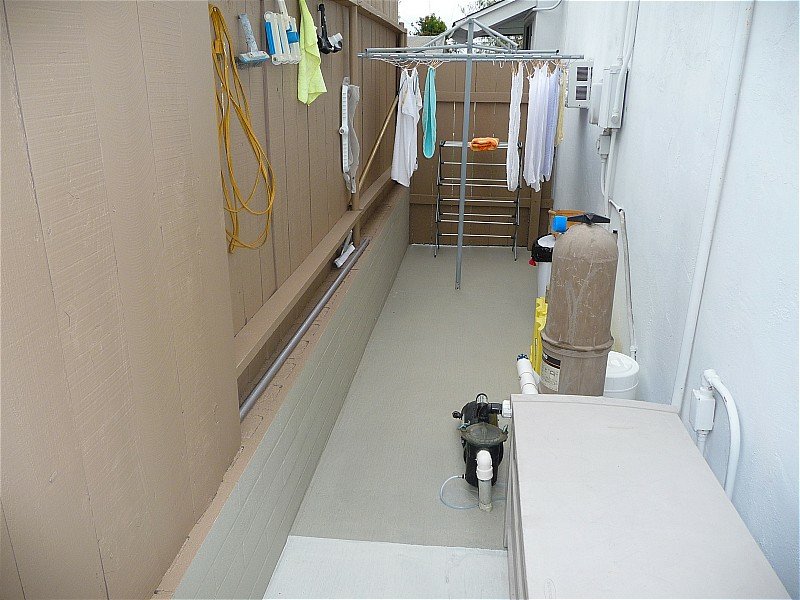 Here's the business end of pool including our clothesline! BION, my wife has always hung the washed clothes outside since that's
the way her mother taught her! And she has done this for 43 years on this property. Of course, the main reason is that the dried
clothes smell great!
Here's the business end of pool including our clothesline! BION, my wife has always hung the washed clothes outside since that's
the way her mother taught her! And she has done this for 43 years on this property. Of course, the main reason is that the dried
clothes smell great! I decided to use the concrete grey color for this area to delineate it from the main pool deck. Also shown is the pool pump [2hp motor and brass pump turns about 12,000 gals/hr] and automatic cholinator [using the pump's suction to draw a metered amount of chlorine] just behind the pool's storage case. Makes for a nice clean area. |
|
 The deck was badly in need of power washing and re-staining. I choose the 25yr Behr stain and it is absolutely fantastic. The deck
floor and fencing were 'bone-dry' and would soak water instantly into it. Now the surface is completely sealed and the wood has a
satin sheen to it.
The deck was badly in need of power washing and re-staining. I choose the 25yr Behr stain and it is absolutely fantastic. The deck
floor and fencing were 'bone-dry' and would soak water instantly into it. Now the surface is completely sealed and the wood has a
satin sheen to it.My wife and I like low-water requirement for succulent and cactus plants. Adding water containers to the bottom of each plant almost guarantees that there isn't any excess water introduced to the wood. Something that we didn't do previously. You see a collection of desert plants and succulents that have thrived well here. |
|
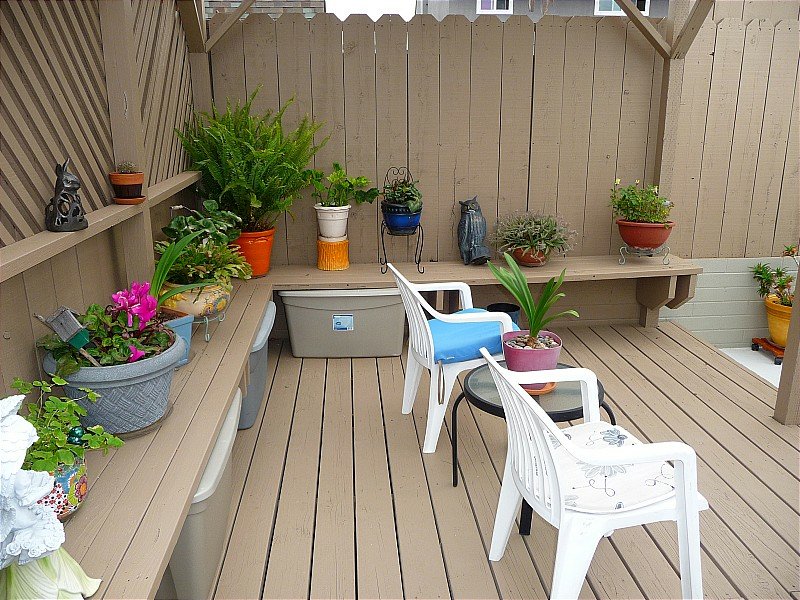
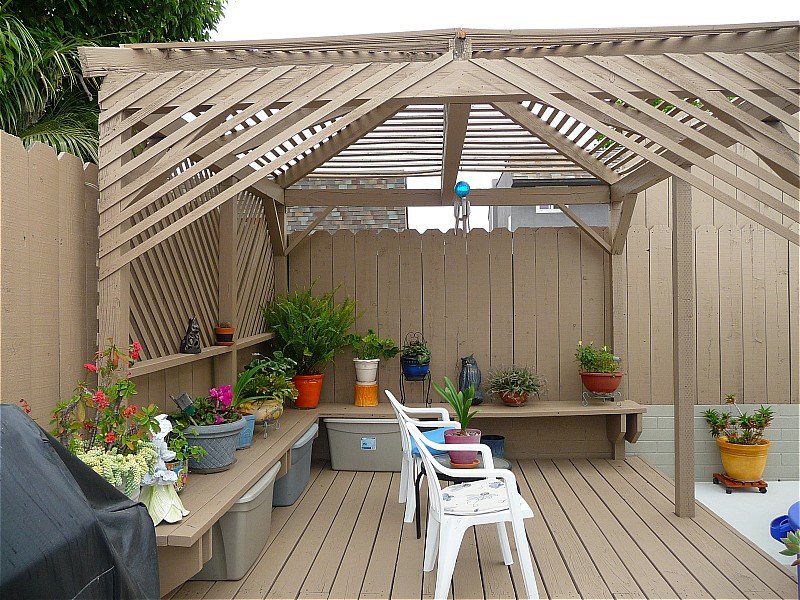 Similar picture to above except the overall gazebo is shown. The top and side slats were all loose as well as the front strapping
so a lot of 'prep' work went into getting it ready for staining.
Similar picture to above except the overall gazebo is shown. The top and side slats were all loose as well as the front strapping
so a lot of 'prep' work went into getting it ready for staining. Partially visible [under the cover] is the Ducane six burner grill. It can be heated to over 550F for grilling. A steak takes about 3mins on one side, 1 min on the other . . . and it's done! |
|
|
Recent Interior Updates
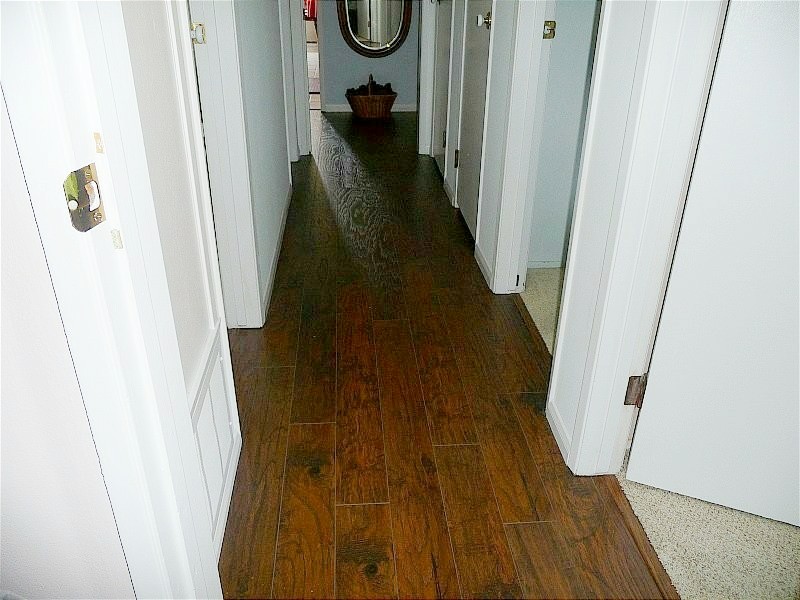 As was stated for the pool and deck area, the interior parts were also badly in need of some TLC. The carpet was 25year old and it
actually looked in decent condition in the main living and family rooms however the main hallway carpet looked like it came directly from
"Tobacco Road"! So it has to go.
As was stated for the pool and deck area, the interior parts were also badly in need of some TLC. The carpet was 25year old and it
actually looked in decent condition in the main living and family rooms however the main hallway carpet looked like it came directly from
"Tobacco Road"! So it has to go.Personally, I've always like carpet since it seems warmer and softer on the feet. However, for the main hallway carpet is not a wise choice. So we chose a commercially rated laminate flooring called "Highlands Hickory" laid over "Silent Step" sound and moisture barrier. |
|
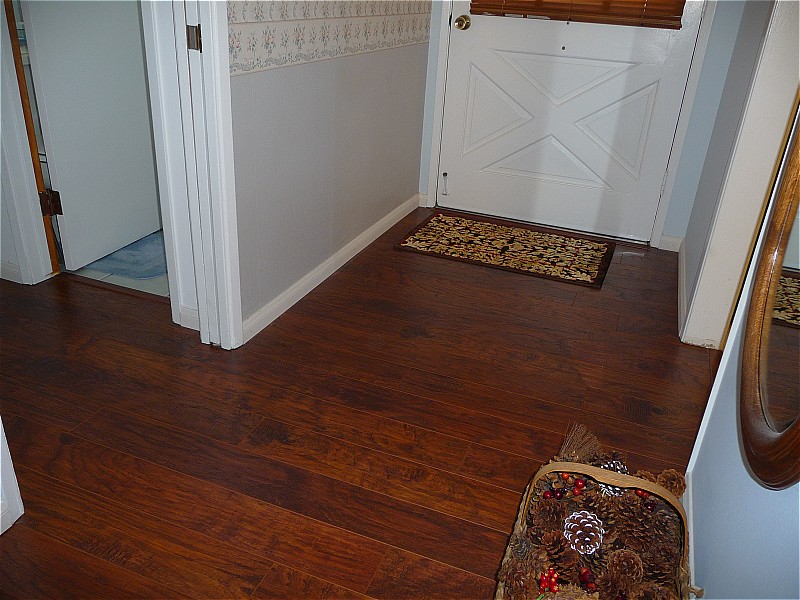 The previous parquet wood flooring in the entry area plus the carpet in the hallway was removed and replaced as shown. The color is on
the 'red' side and it's very rich with the rough texture. The next picture shows that the living carpet was also history!
The previous parquet wood flooring in the entry area plus the carpet in the hallway was removed and replaced as shown. The color is on
the 'red' side and it's very rich with the rough texture. The next picture shows that the living carpet was also history!
|
|
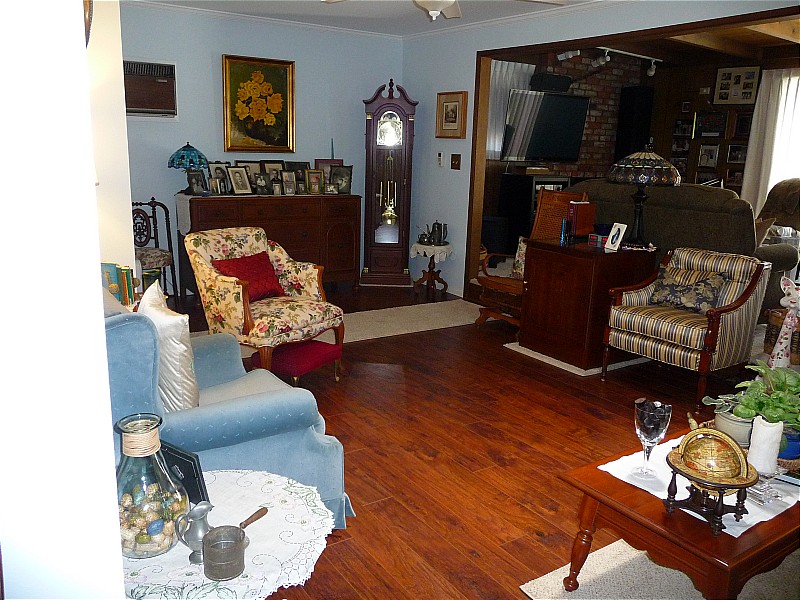
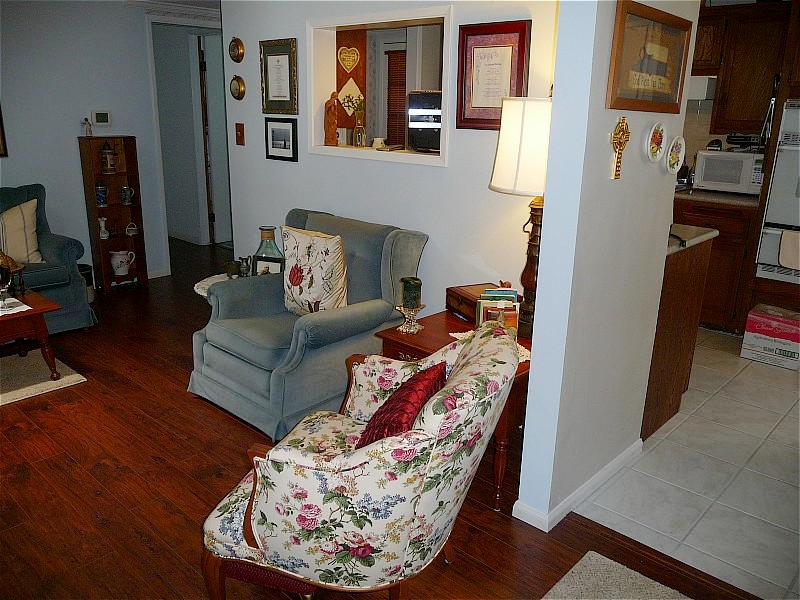
 The living room carpets was replaced the "Highlands Hickory" flooring over a padded "Silent Step" base. As you see, the living room
has a completely different "feel" to it!
The living room carpets was replaced the "Highlands Hickory" flooring over a padded "Silent Step" base. As you see, the living room
has a completely different "feel" to it! Also the new Solatube was installed to brighten this inside room. New lamps and some accent pieces change the flavor of the room. We painted it light blue and added white crown and oversize floor mouldings to change the look. The table by the couch shows my 1942 "Temple" radio that's been rebuilt. Sound is marvellous from the older radios IMO. |
|
 Another view from the hallway entrance show the far end of the living room. The "old" carpet that wasn't damaged was made into
area rugs after it was cut and bound. A long runner from the kitchen to the family room guarantees that you won't slip.
Also added one under the coffee table and my cigar humidor to contrast the floor's darker look. Two new chairs were added.
Another view from the hallway entrance show the far end of the living room. The "old" carpet that wasn't damaged was made into
area rugs after it was cut and bound. A long runner from the kitchen to the family room guarantees that you won't slip.
Also added one under the coffee table and my cigar humidor to contrast the floor's darker look. Two new chairs were added. The solid cherry furniture was refinished and looks spectacular with the flooring. |
|
 This picture shows a view from the family room toward the kitchen. One of the new lamp shades is shown and you can see the richness
of the new flooring.
This picture shows a view from the family room toward the kitchen. One of the new lamp shades is shown and you can see the richness
of the new flooring. |
|
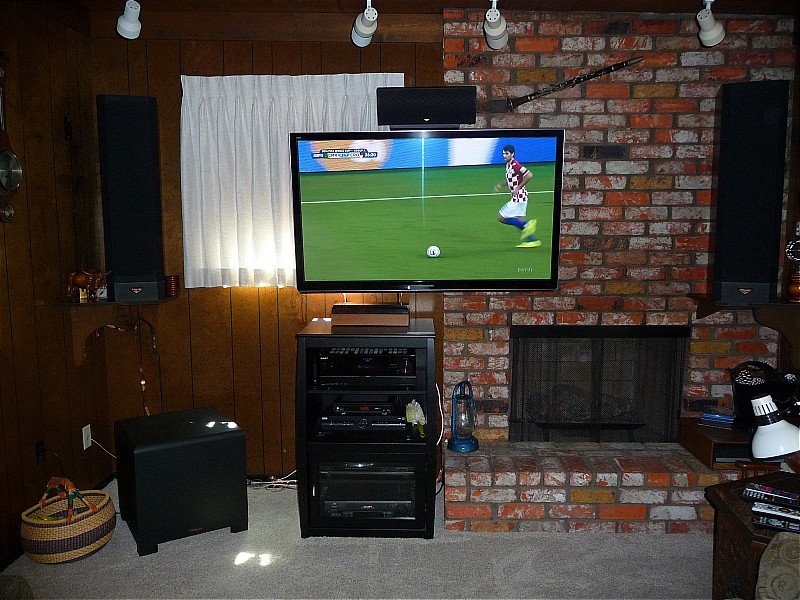 The family room was re-carpeted and two new chairs were purchased.
 The plasma HDTV was originally mounted on a table and took up way too much space. The supporting electronics were housed in a large cabinet that added to the congestion. So I purchased new electronics that reduced the number of 'boxes' so that it would all fit in a new, smaller cabinet. The speakers are Klipsch reference along with a Klipsch 400 watt, 15" sub-woofer. Then the HDTV was mounted on the wall via an articulating mount. As you can see, it has opened up the room considerably. That was a very good move. The center-channel sound was not quite right so I mounted it above the TV so that its position is equal to the tweeters in the main speakers. Wow, what a difference! The new 55" Panasonic TV appears "small". Note that there's apx 12 deg down-tilt to the screen that removes all window reflections. |
|
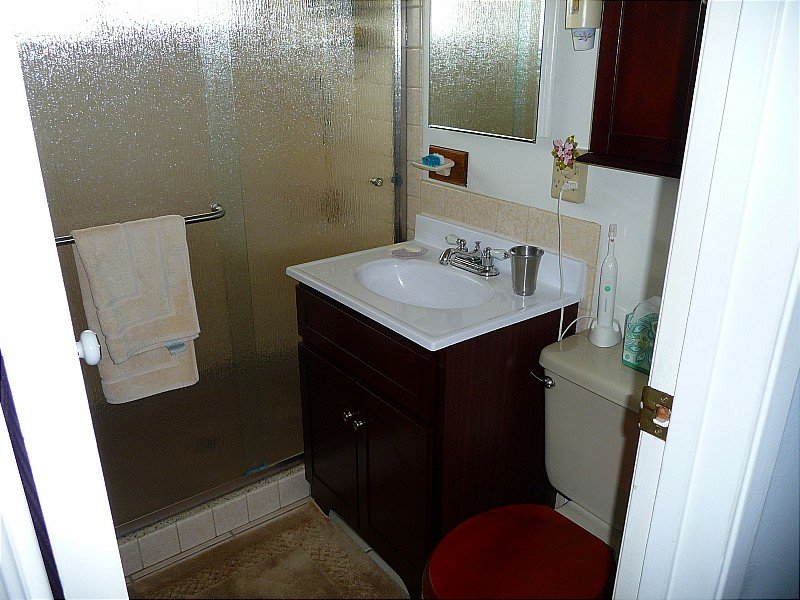 The main bathroom had 25+ year old fixtures so it too had to go! The shower doors are called "rain-glass" and make a striking impression.
The doors are frameless and are apx 1/4" thick glass. Don't think they're heavy . . . try to lift them!
The main bathroom had 25+ year old fixtures so it too had to go! The shower doors are called "rain-glass" and make a striking impression.
The doors are frameless and are apx 1/4" thick glass. Don't think they're heavy . . . try to lift them!The vanity top and cabinet were replaced along with the wall cabinet all in a 'cherry' finish. The medicine cabinet was removed and new recessed version was installed. Even the toilet seat is cherry colored! |
|
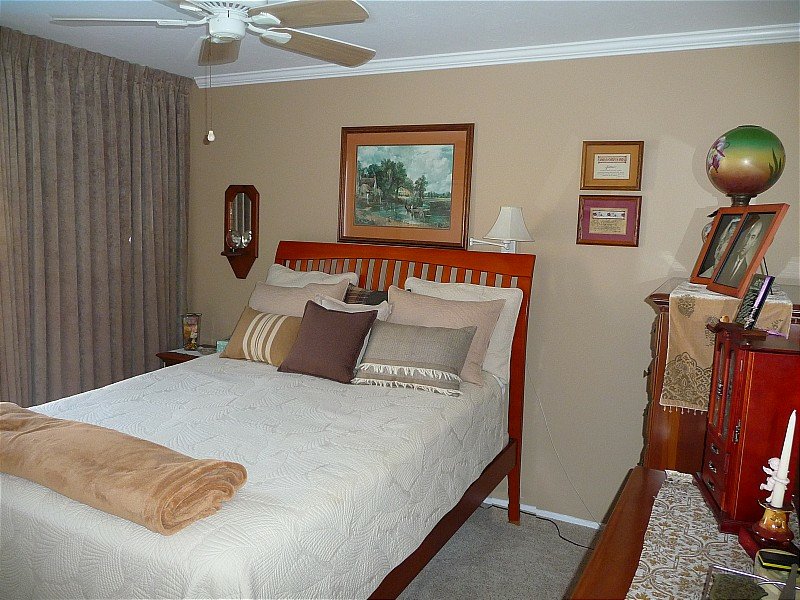 Crown moulding was added to the main bedroom as was new carpet. Then it was painted and looks like a new room!
 Not shown (behind the drapes) is a new vinyl door to the pool deck. The door took seven (7) hours to rebuild and install due to the dry/wet rot on the sill that has accumulated for 41 years! Water from the pool has slashed up against the door for a very long time and took its toll. |
|
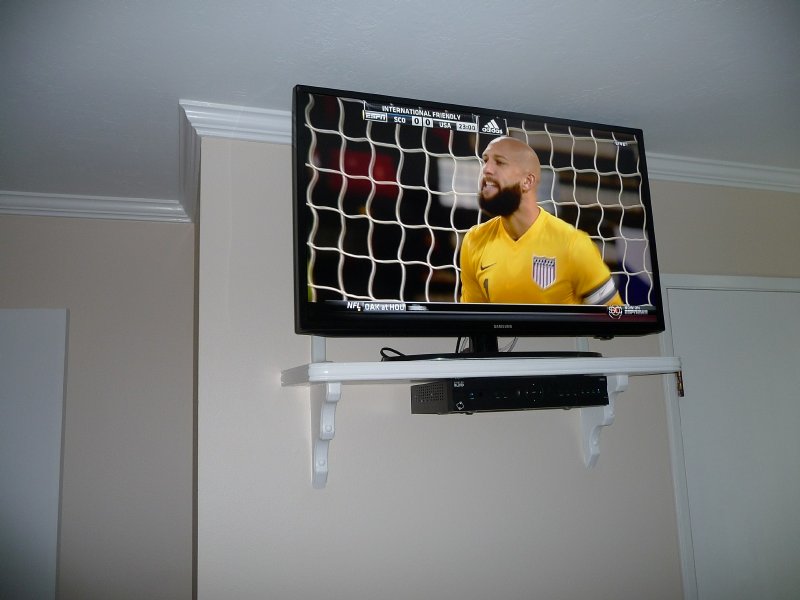 A custom shelf was built for the Samsung 40" LED HDTV. It arrived this morning and was very easy to install. It has a "PIP" feature
which was on my older Pioneer. Nice feature for watching the "second" game!
A custom shelf was built for the Samsung 40" LED HDTV. It arrived this morning and was very easy to install. It has a "PIP" feature
which was on my older Pioneer. Nice feature for watching the "second" game! The view is perfect laying in bed . . . can you say "honey, I don't feel well". . . |
|
 Our small bedroom was completely redone including carpet and an newly added A/C. The room's accessories are very old; check out the
bed. This is a "rope" bed and it literally used ropes (like a hammock) to support a feather mattress. Needless to say, it's wasn't very
comfortable! Bed is about 200+ years old and my wife was born in the bed!
Our small bedroom was completely redone including carpet and an newly added A/C. The room's accessories are very old; check out the
bed. This is a "rope" bed and it literally used ropes (like a hammock) to support a feather mattress. Needless to say, it's wasn't very
comfortable! Bed is about 200+ years old and my wife was born in the bed! The barrister is 100+ years old and was refinished by yours truly. |
